Thursday, March 31, 2011

Unexpected Day Off

 Okay, so Dave and I were to take a few days off but then Dave got a bad cold so after the first night away we "snuck" home and pretended like we were still away.  Dave, poor thing, slept while I set up shop.

My Day Off

 This is our living room coffee table. 
From the left:
Speakers from my desktop
Plugged into my Ipad
Current knitting project
Easter Bunny egg holder
Gorgeous flowers, from Dave (smart man)
My phone
Large cup of water
All in one knitting thingy on top of pattern

Sooo, I caught up on podcasts I've been anxious to listen to.  My favorites are "Knit Misadventures" and "The Balcony Farm" listed at the bottom of this page.  It was a lovely day all to myself.
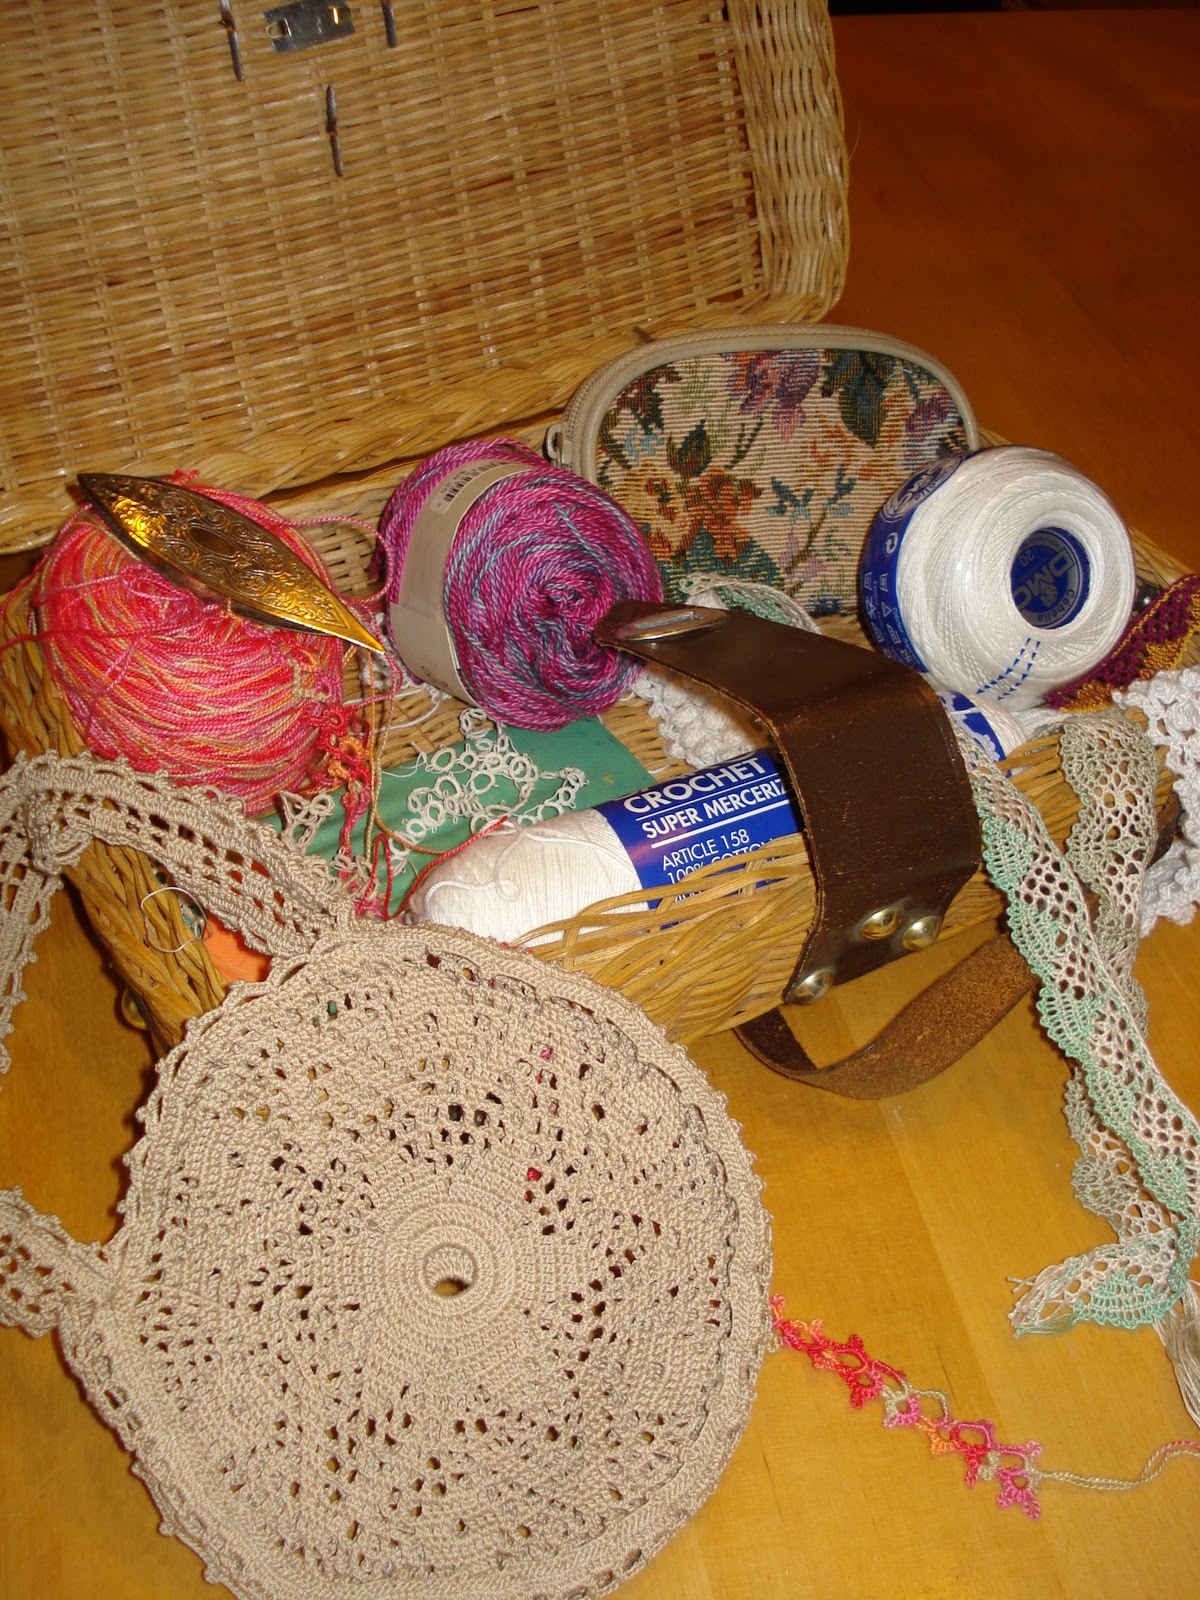

Lace and Such
Easter Egg Holder


I was also able to go through my lace making basket. I plan on making a fabric "sample" lace book which is very Victorian, getting back to the whole "Victorian" theme that I claim to be presenting.  Back then it was usual to not have a pattern for lace so a friend would show you or give you a sample and you would keep it as reference.  "Piecework" magazine recently showed a photo of an old lace reference book.  Adorable.  This will encourage me to start mine.
From the left:
Crocheted thread holder
   You would put your crochet thread inside and wear it on your wrist as your corocheted.  I understand it made a project very portable and kept the thread clean. Imagine walking through your overflowing gardens steadily while crocheting some lace!
Various crochet threads, tatting shuttle and some lace samples I've made.  Some tatted, crocheted and a sample of Bobbin Lace (the white with green fans)


Here is a larger view of my Easter Egg holder. Purchased at Joannes Fabric recently.  It was britht pink which I thought would take away from the eggs, so naturally I spray painted it black.  The foam eggs kept falling through the holders so I added some crinkled paper I found in the back room.  This is the last photo of perfectly smooth eggs which was taken prior to Cara Isabella getting a hold of them and promptly putting teeth marks in each!  You go girl!  Every time we said "no, no" she would turn her little head, as if we couldn't see her, and carry on. What an angel she is.


Syrup Photos


Here are the photos from Sherryl's syrup making adventures. Really, it is the best syrup I have ever tasted! I tried to incorporate these into her previous blog but it didn't work. But here goes!

I understand the boiling down process took several hours for several days, and luckily she didn't have any wallpaper in her kitchen!

Saturday, March 26, 2011

After the Birthday...

 These are Dave's Birthday Pineapple Upside Down Muffins.  I usually make this a cake in a cast iron skillet but I couldn't resist buying this mold this year.  We'll have to make this more than once a year now.  They were excellent if I may say so myself.  Just the right proportion of top to sides!  It didn't brown as nicely as when baked in a skillet but they were as delicious if not better!  See previous posts for the recipe.

It was a great birthday.  We celebrate over a weeks time and I think I managed to keep the surprises coming quite nicely!!!!


Soap holder
 This is the next project at hand.  A crocheted soap holder for all three outdoor faucets at the Stillman Inn.  Complete with flower top!  I think I will regre not using a more open weave pattern as I know how soapy these things can get but at least I made an effort in the direction I intended to take for the summer!

I just used some yarn laying around, picked out a pattern from a crochet/knit pattern book and crossed my fingers.  I used my left over melt and pour soap bars from the craft show we attended.  I actually used the ones that didn't turn out so pretty - who knows!

I must say people treat "melt and pour" soaps as if they are somehow inferior to the traditional lye soaps.  I find these soaps light and refreshing, not overpowering...so there!

'The Ultimate Sourcebook of Knitting and Crochet Stitches' by Readers Digest...you'll love it!

Ever check out the website for "Tasha Tudor"?  I believe her farm is in Vermont and I recently discovered they give tours of her gardens.  Boy, would I just love to do that.  It is 3 hours away from Hull so I'll have to put my brain together and get us there with Dave's brother and his charming wife!

I've been catching up with my podcasts from "Knitting Misadventures".  Elise just started another podcast called "The Balcony Farm". It is amazing what she grows on a very small patio.  She gives lots of good advice so you don't want to miss it.  She also has a website for each of these venues.

Another cool thing for the Ipad:  I downloaded an app called "Flower Garden".  You can grow flowers, water and feed them, make them into bouquets and email them to your friends.  I love this.  It reminds me to water my seedlings and helps me to keep in touch with friends and family by sending them a bouquet once in a while!

Wednesday, March 16, 2011

Syrup Sap Saga Continues

It turns out all three of the taps are working - yippee! At first, only two buckets had sap in them but yesterday, the third started running so that is lots more sap. It tastes like slightly sweetened water with a mineral twang. I have evaporated about 14 gallons and the syrup is starting to taste pretty yummy! There is a fine grainy, sand-like by-product that has to be sieved off before the syrup gets too thick so I have strained it a couple times now. A poor little honey bee flew into the kitchen the other day - I think he was a little confused - but the whole kitchen must smell like sweet, gooey sap that any honey bee would like!
I also made the Waldorf-Astoria Red Velvet recipe - without the red food coloring - and it was oh so delicious! It did actually have a slight dark red tinge to it - maybe because it did not have as much chocolate in it as the second recipe - and the beets' color was more prominent. I actually halved the recipe (it then fit into an 8" square pan) and used cake flower to make sure it was light and fluffy. Oh boy,could I eat Red Velvet all day long!!!
To tag on to what Bernadine has already said about gardening - I started seeds as well. Had to thin out some cabbage sprouts because I over-seeded but I just washed them off and put them is salad - a nice zip! I'll probably buy some tomato plants so I have some early fruit but I started my Romas in the house. I just used up the last of my harvest from last year in some awesome Red Italian Gravy - recipe from my MIL - the key is to use pork neck bones!
PS I tried to add pics but it would not download. Anyone have any ideas on how best to do that?

Saturday, March 12, 2011

Gardening 2011

 Come on, just warm up!  That's all I'm thinkin these days when I'm walking around the gardens.  Just itching to get started, even if it's just clean up! 

This year I took a look at Mel Barthomolmew's book 'All New Square Foot Gardening'.  I remember my uncle, some twenty years ago, must have used this system because he had a garden that looked just like this.  And he lived in Chicago.  He had the best tomatoes I have ever seen.  Love the suggestions in this book, less is more, close to the kitchen door, great idea for a growing mix...I'm so psyched about it.

So...I've started some seeds inside.  This usually doesn't work for me.  Last year was the best yet but I set them on the floor by the atrium door for more sunlight.  Next morning I discovered my tortoise, Nelson, who was allowed to roam the house freely, made a delightful dinner out of my efforts.  You couldn't keep him off the top of the seedlings.  Oh well.

One of Mel's suggestion was "don't go full out the first year".  Good advice as I usually have to go full out.

I'm going to start with 2 or 3 4x4' boxes.  I will call it my Kitchen Garden and take our guests on tours of it!  Sharing the harvest of course. But if I do it right, there won't be bushels full of extras.

Is there anything as lovely as a rain sprinkled Iris?  I mean next to my granddaughter of course!

I think I better start exercising so I can keep up with my dreams this summer!


Due to economic conditions last year I had to limit the number of containers I planted, but the ones I had were so beautiful.  I used containers by our private quarters for herbs and such.  I planted mint once and learned the consequences of that.  it went everywhere! 


And forget-we-not about planting for Fall! 

Milwaukee has a great Botanical Garden.  Perfect size, beautiful architecture and of course plants.  Last year it was perfect because inside they had a quilt display!!!!!

Let's see, we'll need sunflowers, Canna Lilies, check on the blueberry bush I planted last year, find a way to remember what I put where.....oh yes, and sit back and enjoy them with a nice refreshing cup of iced tea (note to self, plant mint for tea)! 


Thursday, March 10, 2011

Box Elder syrup

When we lived in the suburbs, a friend and I got curious about how Maple syrup was made. We did some research and found out that you can collect the sap of Silver Maples to boil down for syrup as well as Sugar Maple. So, we bought the equipment and made some yummy syrup from her big Silver Maples.

22 years ago, when we moved out to the country, that was one of those things on my "must have" list - a Maple tree.There was a young Maple in the yard but it was not large enough yet to tap. Come to find out that a "noxious weed tree", the Box Elder of infamous Box Elder bug fame, is part of the Acer family.

I trudged out with my kids to tap all the Box Elders we could find (no trouble there!)and made lots of syrup. Yes, it tastes just like Maple syrup and has the same consistency. The problem is that it takes twice the sap!

This year, with the nights freezing and the days above 32, I got the bug to tap again. I found a really big Box Elder and put in three taps. I'll check daily to make sure I hit the sapwood - it is tricky when the tree gets to be larger than 12-18 inches in diameter.Geo is worried that the steam from the boiling will take the wallpaper off in the bathroom - a room that is around the corner and down the hall from the kitchen - that is how bad the steam is when it is cooking! But, it will be worth it and I need new wallpaper in there anyway;-)I'll keep you all posted!

Red Velvet

We are back from our trip to Georgia. Geo helped our son redo his bathroom and I mostly cooked, helped Jenn bake a Red Velvet Cake and watched my grandson, James, who is quite precocious at 2! We decided to make the cake recipe that included pureed beets, apple cider vinegar and buttermilk. It also called for melted unsweetened chocolate and cocoa powder. We did not add the 1 teaspoon of food coloring - you would not have seen it anyway with all that dark chocolate. We used the Waldorf-Astoria frosting - mascarpone, cream cheese and heavy cream with a little sugar. We were a little unsure of the oven temp and so, overcooked the cake a teeny bit. But who cares because it was so delicious!!! The frosting was extraordinary - good for other cakes!! We did not have a really good blender for pureeing so there were some little beet chunks - no, they did not taste like beets at all!I did not get any pix of it. When I make the second recipe, I'll be sure to do that. Here is the one we used-enjoy:

Traditional Red Velvet Cake Recipe ( made with beets)
4 ounces unsweetened chocolate, chopped
1 c pureed cooked beets
2 1/4 cups flour
1/3 cup cocoa
2 tsp. baking soda
1/2 tsp. salt
1 1/2 sticks unsalted butter, softened
1 1/4 cups firmly packed light brown sugar
1 cup granulated sugar
3 large eggs
2 tsp. vanilla
2/3 cup buttermilk
2 tsp. cider vinegar

Preheat oven to 350 degrees .Butter and flour two 9 inch cake pans.Melt chocolate in double boiler and set aside .Sift together flour, cocoa, baking soda and salt.In a bowl beat butter, sugars, eggs and vanilla until light and fluffy, about 5 minutes. Beat in chocolate. Alternately beat in flour mixture and buttermilk mixed with vinegar , beginning and ending with flour. Beat until incorporated. Add pureed beets and mix until well blended.
Divide the batter between the pans. Bake for 30 to 35 minutes, or until cake tester inserted in center comes out clean and top of cake springs back when lightly pressed.Cool cakes in pans on wire racks for 10 minutes and invert onto racks to cool completely.
Frosting:
2 cups heavy cream
12 oz cream cheese, softened
12 oz mascarpone
1/2 t vanilla
1.5 cups powdered sugar
Pour cream into small bowl and whip to soft peaks. Refrigerate. Place cream cheese in a bowl and mix on low speed until soft and smooth. Add mascarpone and mix until combined. Add vanilla and powdered sugar and mix well. Fold in whipped cream by hand with spatula. Refrigerate until ready to assemble.

Thursday, March 3, 2011

It Takes A Village....


The first thought that crossed my mind when I started this blog was "It takes a village to raise a child".  That is so true.  Unfortunately "we", our society is not doing a very good job at that these days.  Something to pray about!

Anyway, I made these "village" pillows from a Simplicity pattern quite some time ago and they never get thrown out so we must enjoy them.  It was fun, easy and used up scraps which is really great!

Then of course, with the theme, we have a child.  Our granddaughter "Cara Isabelle".  She is a cutey and quite the independent one but loves to cuddle so...she is perfect.

She is always going into the cabinets so we decided to dedicate one as her "playroom".  She loves, loves, loves it. She's in there often.  Don't suppose she'll fit too well for very long but for now it is her perfect castle.

Can hardly believe we will be blessed with another granddaughter July 14th.  Yay!